Thursday, February 22, 2007

A summer's diversion from my own bungalow for my Mom


I was surprised to say the least. My mother called last year in March to tell me that she wanted to buy a house in town so she had a place to call her own when she was spending time with her grandchildren. Thus began a hunt. She had her interests, I had my mental "walls" and between the two of us, we had to find common ground. The common ground was she wanted something in my neighborhood, close to me, and she didn't want a condo or something like that. It had to be a house.


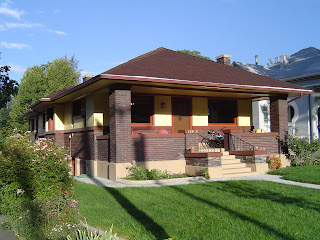
What I found her was a beautiful Arts and Crafts style home built in 1914 one block from where mine is. It was built by a swiss immigrant to the city, and bears windows that demonstrate his homeland. The house had bones--and I mean great ones. Clinker style green brick on the exterior, except the gables, which were covered in wood shingles. The roof is aluminum, so it will probably last a long, long time. But the inside has the real treasures--woodwork, of course. Really wonderful built-in bookcases, staircase, and great trim, all unpainted, darkly stained fir. It had some negatives too, mostly an abysmal kitchen and a master bath that had all its fixtures stuffed into what should have been a shower. Of course, it had plenty of wallpaper to strip, and carpet to rip out.


Mom and my stepdad arrived in the beginning of May, and closed on home immediately. The previous owner had inherited it from her parents, and lived in it as a girl. It meant a lot to her, and she was happy to see it go to someone who would fix it up. The work began immediately, mostly scraping and more scraping to rid the walls of wallpaper. For a month, not much else happened, until the last 10 days, when some painting occurred. Decisions were made on plans for kitchen and master bath, and the contractor was selected.


After Mom left, the contractor got to work, and worked his magic. Soon, I started noticing that I didn't want the new kitchen and master bath's woodwork to be painted MDF instead of matching the rest of the house. So, I started dumpster diving to save the Fir taken out of the house. I pulled nails, planed it, edged it, sanded it, and had it ready for reuse. Then the doors called. I stripped 4 doors, luckily they only had a couple layers of paint. The results were great. The contractor put it all back together, supplementing wood where needed, and a professional painter did the staining and varnishing.


When Mom re-arrived this fall, she was thrilled. Her job was decorating, my step-dad's was finishing the painting inside the house. They had fun. Thanksgiving was celebrated in the house, as a sign that we had won the battle. For Christmas I gave Mom a beginning to end picture album of the project.
I say that tongue in cheek. This spring the house will get some updating on landscaping, and hopefully, a bit of exterior paint. Mom can't wait. Now you see where I get it from.


Monday, February 19, 2007

Freezing Bedroom gets insulation and a redo


It looks nice now, with fresh paint on smooth walls, and nice carpet, and shining woodwork. But I can assure you it was nothing to be to thrilled about when we walked into this house. You see, our house had been "chopped" into three units. One in the front of the basement, one that occupied the bulk of the main floor, and one that covered the back half of the basement and the back two rooms of the upstairs. And of course, this room had a staircase coming up into it. It also was freezing all winter long. Zero insulation in the walls, and a crawl space underneath it (the only crawl space at our place) and about 3 inches of insulation above it.


It sits at the NW corner of our house, in a frame addition that was put on in the late 20's, and has served as a bedroom for different kids as time has moved by. Right now, it houses both our sons, ages 6 and 3. I can now say that they love it.


My first task in the room was to take out, or just cap over that stair case. There were half walls surrounding it, and they had to be removed. Then I had my first experience at putting floor joists in with nice brackets, and covering it with plywood. It went well, and was kind of fun. The only tough part was getting the final floor fairly level with the rest of it. I'll confess that after that was done, the room pretty much stayed in that form (with a bed covering the part with no carpet) for 3 or more years. We did have some electrical outlets added, and a nice ceiling fan and lighting put in. But the radiator in the room just couldn't cut it.


In 2005, we had the entire attic insulated with enough insulation to make a big difference. Still, that room just wasn't comfortable in the winter. It would be 65 when the rest of the house was 72, and colder at night. So, I ripped off the sheetrock on the two exterior walls, and as I suspected, there was no insulation. I added some "extensions" to all the studs to make the stud cavity's larger, then insulated. Sounds quick, but it took a long time. Taking out that plaster system (over a fiberboard) was time consuming. I think I pulled 1000 nails. After putting in the insulation and then having an electrician run some additional wiring for outlets, I had to add some 1 inch finish quality strips to all the door and window jambs.


Then I let the Sheetrock man do his work. Joe Wright, 40 plus years in the business, did an incredible job. He covered the bare walls, and the other two with new sheetrock, and put a texture on the ceiling. No more can you see wallpaper lines under the paint. The difference between his work and what I would have been able to do is incredible. No visible joints. I admire people who can do that. Then my wife painted the room, and the process of getting the woodwork ready began. Same as before, I had run it all through the planer, then sanded it like mad, and finished it after we reattached it.


The carpet is nice stuff, expensive, and the only carpet on the main floor. I don't like carpet much--a perpetual trap for dust, hair and dirt. But in a room where comfort and warmth is the goal, its perfect. Plus, the wood floor had a big "hole" because of the staircase that had been cut into it.


Saturday, February 17, 2007

Wood.....my refinishing addiction


One of the reasons I probably liked this house enough to buy it was the incredible woodwork in the living room/dining room that had never been painted. I'm one of those people who starts looking at woodwork immediately after entering a home.


My least favorite hacienda's--70's ranch style homes with tiny baseboard and trim, all rounded off at the top and painted white.


So, as we progressed through this house, from room to room fixing things as we could, woodwork always got a new look. No area of my house exhibits this like the hallway we have that runs from kitchen to the rear. For the most part, it is just doors--one to the bath, and one to three different bedrooms. It also has authentic bungalow "built-ins" which are great. But of course, when we bought the house all of this was painted, mostly white. The plaster walls were covered in painted over wallpaper. It all pretty much stayed that way until my wife got mad one day.


Believe it or not, she thankfully wasn't mad at me. She was angry enough to need a "physical" way to work out her anger, and had picked up my wallpaper stripping razor blade on a handle and gone at it. The hallway was full of wallpaper. By the time she finished, it was probably a foot high on the floor. She took a great deal of pride in it too. After she was done, the plaster crack and knick patching began. My Dad (very handy), helped me take all the baseboard and door trim off the walls. I labeled the boards, and pulled a lot of nails with a pair of vice-grips. Then I decided it was too much wood to strip with chemicals without harm to brain cells, so I bought a nice wood planer at home depot and started running the boards through. The wood is Douglas Fir, and some of it is flat grained, other pieces vertical grained. The flat grained stuff was harder, because it took a lot of sanding, and the wood was old enough that planing it sometimes set off some delaminating. But, it was one incredibly quick way to take paint off. For a bungalow with flat board trim, it works great.

I stripped the doors with a heat gun, then sanded like mad. I used amber shellac to put both color and finish back on the wood. The product is an old one, was used quite a bit in these Bungalows originally, and has a beautiful glow. 4 layers is the key, and they dry very fast. My wife painted the hallway walls and ceiling red, which we love. It is the antithesis of what that hallway looked like when we bought the house. We added lighting from Rejuvenation, and had an electrician put all the necessary wiring in to make it work on one switch.


I've done this process in 3 bedrooms and this hallway, and I used it on the house my Mom bought here in Provo, though with a different finish. I've added an edger, and a sanding center to my collection of power tools to speed this process up. My house is full of shining beautiful wood, but I sure pity those whose homes aren't.


Friday, February 16, 2007

Paint....it shouldn't wait.


When we moved in, our home was brick on the bottom, and yellow painted stucco and yellow painted trim. Everywhere.....yellow. It was boring, and not a historically accurate bungalow color. I didn't touch it the first year, too busy with getting a new roof, and all sorts of interior problems. But watching too much "This Old House" does something to your brain, making it more powerful than the whining of your limbs and back. So, we decided to paint, starting with the front of the house.


Sherwin Williams, (then and now) has a beautiful selection of historic paint colors for different home types. A great one for Bungalows, and a really good one for Victorian homes. After staring at that long enough, we'd made up our minds to go for it. One color for the previously painted concrete foundation (under the brick), one for concrete caps on top of the brick, one for the stucco, and one for the trim. Multi-color looked, and sounded more exciting. The first thing I did was scrape paint off the porch beadboard ceiling. Then the fun started. To me, painting (as long as I like the colors) isn't too bad. The transformation is the fun part.


After the front, came the south side. It seemed to take forever. Once finished, the house was looking great. Unfortunately, fall had come, and I was running out of time, and figured the north side, and the rear would have to wait. Then, luck struck. The local Neighborhood Housing Services (non-profit that helps revitalize historic neighborhoods) had helped the neighborhood with a big "Paint Your Heart Out" project where several homes were painted in a day by hundreds of volunteers. Having been actively involved, I got to know the staff, and they called me asking me if I knew of any service projects available for local college students (BYU). I said of course, send them over, and for the next couple of Saturday's I was blessed with about a dozen volunteers helping me do the rest of the house. When finished, the house was different, but so was the street.


The next summer, the gentleman that owns the Victorian next door spent over $10,000 having it painted professionally. Huge house, that looked worse than mine. You see, a fresh paint job does this sort of "keep up with the joneses" thing to your neighbors if theirs looks shabby.

Tuesday, February 13, 2007

I can't wait for Spring to arrive!


Green...... and colors. I'm ready for spring and literally hundreds of bulbs to spring up out of my flower beds and once again say hello to the world. December and January were just too cold, and February has finally started a warming trend, accompanied by some rain here in the valley (snow in the mountains). It hit 60 on Saturday and I thought it was heaven. I spent the afternoon clipping my healthy, but ancient roses that have been growing along my driveway for decades. They were planted by the previous owner, and provide their own burst of colors starting in May.
When we bought this home, there was no real yard, or flower beds to speak of. Other than the roses and an enormous sycamore in the park strip, there was no landscaping. There wasn't any sprinkler system, and the back yard appeared overgrown by some sort of enormous shrub/bush thing. The back yard isn't huge--maybe 35 feet from the edge of the house to the fence. Most of it was sold to a developer who put in an apartment building in the mid 1990's. I don't like to think about what could have been.
When I started clipping away at that shrub thing, my goal was to destroy--and I had no idea that it covered a small concrete patio on the south side of the lawn. Once it was gone, we also found the dying remains of a peach tree. It didn't make it. There was no real grass, and in Utah, you have a real tough time keeping grass alive without sprinklers.
We gave a feeble attempt, but in 2003, in went sprinklers, sod, and concrete edging. It was an exciting spring. Suddenly, we had a real lawn, and a way to keep all sorts of plants alive. We did lose the Sycamore to various factors. It had been topped once, and was rotting from the ground up, and we had to replace our sidewalk, all of which meant the end. I was sure glad it was technically the city's tree and they had to pay for its removal. The flower beds were ( and are) incredible. At that point, they were a blank slate. Now they have become an endless stream of colors. I can thank my friend Maria Sawdey for many of them. Maria is a woman with a true love for gardening. Her garden is an inspiration to any who have seen it. She brought me all sorts of perennials which helped get things started. From one little plant, they grow wonderfully, until I've even separated them, given plants to others, etc. In addition, my Dutch roots must inspire me to buy more and more bulbs each year, so spring is a festival for me.
When it comes, I'll start my daily walk through the yard to see what progress has come--counting it in inches, and blooms, and the which parts of the yard are in their glory.
PS--the pictures aren't spring flowers--they are fall bloomers. The one on the right is Autumn Joy Sedum. Can't think of the left one right this moment.

Saturday, February 10, 2007

Air Conditioning--Don't ever buy a home without it


When we bought our 1919 house, its only climate control was the hot water heating system that had been in the house since the beginning (boiler replaced in the 1970's). Our first summer in the house was the hottest of my life. Every day out here in the high desert (despite being next to higher mountains), the sun would bake the brick and stucco all day long, and it would take until about 1 am for the house to cool off. Absorb heat all day, release heat all night. Mornings were the only "pleasant" time in the house.


I vowed that was the end, and bought a whopper window AC unit. One of my nicer neighbors put in the 220 wiring for it, and our kitchen became a deep freeze each summer for the next 3 years. We stationed fans at each of its doors to blow air into other rooms. What can I say, it made life tolerable. In the spring of 2004, we had finished two of the necessary tasks to add central air. First we had to figure out where to put all the ductwork. The only answer was the attic. Then, after looking around the attic, in the midst of the mineral wool insulation covered in soot, we could see that there was ancient wiring running all over the place to all the ceiling lights and other things. I hired an unemployed electrician to redo all of it--the best value I ever got in electric work. He put in ceiling fans in the bedrooms, added electrical outlets on interior walls, and it made a "quality of life" difference.


After looking at the bids, and different options, we chose a Trane system, with a nice air handler, and chose against the high velocity systems. No need for it. We had plenty of room for ductwork. We did sacrifice one corner of a closet to run the AC down into two basement bedrooms. After a week of work, the system was on--and blessing us with wonderfully cool air. Almost too cool. It looks like a metal octopus with all these plastic tentacles streaming off in multiple directions in our attic.


Thursday, February 08, 2007

"Why did this take 6 years?"


It is a darn good question. Why did it take 6 1/2 years to get a dishwasher in this house? Poverty can't even be claimed as the answer, since it sure didn't stop anything else from happening. My wife, I, and my step daughters were sick and tired of washing dishes, and with 6 people in the house, we were washing plenty of them.


The truth is, for a long time, other things were just more important to us. Getting the house presentable, and functional. Then of course you have things like a new roof, air conditioning so you can survive Utah's summers, and a sprinkler system and landscaping so the yard looks decent. There were the times when disaster struck and we discovered problems which couldn't wait for solutions too.

But kitchens just aren't simple. Do you give up on the 50's cabinets, which we had painted once, and go for something you really want, including the countertops, etc? Debate swirled through our minds and gently between us. Spending $25,000 or so is a little hard for a financial planner--trust me. There are just always other things to spend it on, or save it for. Debt isn't my or my wife's favorite word.


But finally, I had no more excuses, and realized that those cabinets weren't so bad. I saw "small fixes that could make thet kitchen work for years to come. So, I first had to remove a set of drawers, and the dividers that had been built for them and turn the space into a "hole" for the dishwasher. Then, I took out the cabinet next to that area and rebuilt those same drawers, which were more valuable than the cabinet was to us. One call to the electrician, one call to the plumber, and a trip to Sears and the deed was happily done.

Since then, I just can't believe how clean our countertops stay, and how much less time we each spend in the kitchen. I think my wife even smiles more.